ssh.sshslowdns.com – Secure Shell (SSH) is a powerful tool that allows for secure remote access and management of servers. In this guide, we will walk you through the step-by-step process of installing and configuring an SSH server on Ubuntu 20.04. We will cover everything from basic installation to advanced configuration options, ensuring that your SSH server is secure and efficient.
SSH is an essential tool for system administrators and anyone who needs to manage remote servers. It provides a secure and encrypted channel for communication, allowing you to execute commands, transfer files, and manage users and permissions remotely.
Installation Procedure
Installing an SSH server on Ubuntu 20.04 is a straightforward process. Follow these steps to set up a secure and efficient SSH server on your system:
Begin by updating your system’s package list:
sudo apt update
Next, install the OpenSSH server package:
sudo apt install openssh-server
After installation, start the SSH service:
sudo systemctl start ssh
Enable the SSH service to start automatically on system boot:
sudo systemctl enable ssh
To improve security, it’s recommended to disable root login via SSH:
- Open the SSH configuration file:
sudo nano /etc/ssh/sshd_config- Find the line that says “PermitRootLogin” and change it to “no”.
- Save and close the file.
- Restart the SSH service to apply the changes:
sudo systemctl restart ssh
To allow specific users to access the SSH server, add them to the “sudo” group:
sudo usermod

-aG sudo username
Server Configuration
To ensure the security of your SSH server, it is essential to configure it optimally. This involves configuring settings related to port forwarding, authentication methods, and access control.
By default, SSH runs on port 22. For enhanced security, it is recommended to change this default port to a non-standard one. This makes it more difficult for attackers to identify and target your SSH server.
Authentication Methods
SSH supports various authentication methods, including password-based and key-based authentication. Password-based authentication is less secure as it involves transmitting the password over the network, which can be intercepted by attackers. Key-based authentication is more secure as it uses cryptographic keys to authenticate users, eliminating the need to transmit passwords.
Access Control
Access control is crucial for restricting access to your SSH server and protecting it from unauthorized users. You can implement access control by configuring firewall rules, setting up user permissions, and using SSH key-based authentication.
User Management

Managing users for SSH access involves creating, modifying, and deleting user accounts. This section covers best practices for password security and user permissions to ensure secure and controlled access to your server.
To create a new user account, use the adduser command followed by the desired username. You will be prompted to set a password and provide additional information such as the user’s full name and home directory.
Password Security
Strong password security is crucial for protecting your server from unauthorized access. Encourage users to create complex passwords that include a mix of uppercase and lowercase letters, numbers, and special characters. Avoid using common words or personal information that can be easily guessed.
User Permissions
Properly configuring user permissions is essential for limiting access to sensitive files and commands. Use the usermod command to modify a user’s group membership, home directory, and shell access. By default, new users are added to the users group, which has limited privileges.
Consider creating custom groups and assigning appropriate permissions based on the user’s role and responsibilities.
Key-Based Authentication
SSH key-based authentication offers an alternative to password-based authentication, providing enhanced security and convenience. By leveraging SSH keys, you can establish a secure connection without the need to enter a password. This mechanism relies on a pair of keys, a private key, and a public key.
The private key remains on your local machine, while the public key is shared with the remote server. When you attempt to connect to the server, the server compares the public key you provide with the stored public key. If they match, access is granted without requiring a password.
Benefits of Key-Based Authentication
Key-based authentication offers several advantages over password-based authentication:
- Enhanced Security: SSH keys are cryptographically secure, making them significantly more challenging to crack compared to passwords. This reduces the risk of unauthorized access.
- Convenience: With key-based authentication, you can connect to remote servers without repeatedly entering passwords. This streamlines the login process, especially if you frequently access multiple servers.
- Automated Access: SSH keys can be used for automated tasks, such as server administration or continuous integration/continuous delivery (CI/CD) pipelines. This eliminates the need for manual password entry, reducing the risk of errors and improving efficiency.
Generating and Managing SSH Keys
To set up SSH key-based authentication, you need to generate a pair of SSH keys:
- Open your terminal and enter the following command to generate a new key pair:
ssh-keygen
- t rsa
- b 4096
- Follow the prompts to specify the location where you want to save the keys and provide a passphrase to protect the private key. The passphrase is optional, but it adds an extra layer of security.
- Once the key pair is generated, you can view the public key by using the command:
cat ~/.ssh/id_rsa.pub
- Copy the public key and add it to the authorized_keys file on the remote server. You can do this using the following command:
ssh-copy-id user@remote_server
After completing these steps, you can connect to the remote server using the following command:
ssh user@remote_server
You will not be prompted for a password if the key-based authentication is set up correctly.
Firewall Configuration
To allow SSH traffic, you must configure the firewall to permit connections on port 22.
Port forwarding is crucial for remote access to specific services on your server. It allows you to redirect incoming traffic from one port to another, ensuring seamless communication between your client and the desired service.
UFW Firewall
To set up port forwarding using UFW, follow these steps:
- Allow SSH traffic on port 22:
- Forward port 80 (HTTP) to port 8080:
- Enable UFW:
SSH Tunneling
SSH tunneling is a technique that allows you to create a secure tunnel through an SSH connection. This tunnel can be used to securely transfer data between two hosts, even if they are not directly connected.
To set up SSH tunneling, you will need to create a SSH server on one host and a SSH client on the other. Once the SSH connection is established, you can use the -L option to create a tunnel.
The following command creates a tunnel from port 8080 on the local host to port 80 on the remote host:
ssh
-L 8080
remote_host:80 user@remote_host
Once the tunnel is created, you can access the remote host’s port 80 by connecting to port 8080 on the local host. This allows you to securely transfer data between the two hosts, even if they are not directly connected.
Secure Data Transfer
SSH tunneling can be used for a variety of purposes, including secure data transfer. For example, you can use SSH tunneling to securely transfer files between two hosts, or to securely access a web server on a remote host.
SSH tunneling is a versatile and powerful tool that can be used to securely transfer data between two hosts. It is a valuable tool for anyone who needs to securely transfer data over a network.
Troubleshooting Common Issues
Encountering issues while installing or using an SSH server is not uncommon. Here are some common problems you may face along with their solutions:
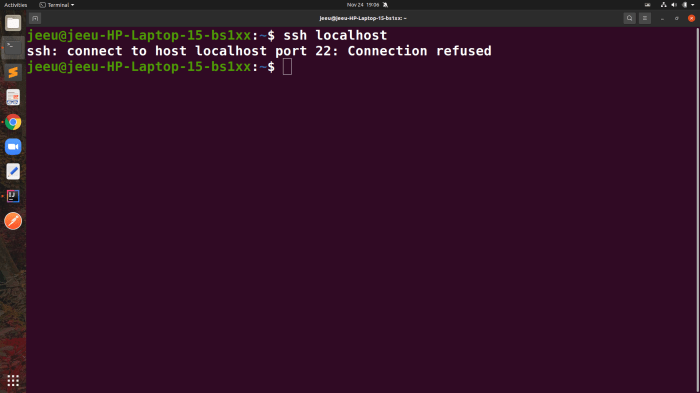
Connection Refused
- Ensure that the SSH server is running and listening on the correct port (default: 22).
- Verify that the firewall is not blocking incoming connections on port 22.
- Check if the SSH service is disabled. Use the command “sudo systemctl status ssh” to confirm.
Permission Denied
- Confirm that the user attempting to connect has valid SSH credentials.
- Verify that the user’s home directory has the correct permissions. The directory should be owned by the user and have the permissions set to 700.
Host Key Mismatch
- When connecting to an SSH server for the first time, you may encounter a host key mismatch error.
- To resolve this, accept the host key by typing “yes” when prompted.
- The host key will be stored in the known_hosts file for future connections.
Timeout Errors
- If you experience timeout errors while connecting to the SSH server, check your network connection.
- Verify that the SSH server is not overloaded or experiencing high traffic.
- Increase the connection timeout value in the SSH client configuration.
Authentication Failed
- Ensure that you are using the correct username and password or SSH key.
- Verify that the SSH server is configured to allow password or key-based authentication.
- Check if there are any restrictions on the user’s account, such as failed login attempts.
Advanced Configuration

In addition to the basic setup, SSH offers a range of advanced configuration options for customizing the server’s behavior. These options provide granular control over aspects like logging, performance, and security.
By understanding and leveraging these advanced settings, you can tailor the SSH server to meet specific requirements and optimize its performance for your environment.
Custom Configurations
The SSH server’s configuration file (/etc/ssh/sshd_config) allows for extensive customization. Parameters can be adjusted to modify the default settings, such as:
- Port number
- Allowed authentication methods
- Logging levels
- Cipher suites
- Connection limits
Logging
Logging is crucial for troubleshooting and security auditing. SSH provides comprehensive logging capabilities that can be configured to capture various levels of information, including:
- Authentication attempts
- Connection events
- Command executions
- Error messages
Logging can be enabled and customized through the “SyslogFacility” and “LogLevel” directives in the configuration file.
Performance Tuning
Optimizing SSH server performance is essential for handling heavy workloads and ensuring a responsive user experience. Several parameters can be adjusted to improve performance, such as:
- Increasing the number of concurrent connections
- Tuning the packet size
- Disabling unnecessary features
- Using faster encryption algorithms
Best Practices for Secure SSH Usage
SSH is a powerful tool that can provide secure remote access to your server. However, it’s important to use SSH securely to protect your system from unauthorized access. Here are some best practices for using SSH securely:
Use strong passwords. Strong passwords are at least 12 characters long and contain a mix of uppercase and lowercase letters, numbers, and symbols. Avoid using common words or phrases that can be easily guessed.
Two-Factor Authentication
Two-factor authentication (2FA) adds an extra layer of security to your SSH login by requiring you to provide two forms of authentication, such as a password and a one-time code sent to your phone.
Monitoring for Suspicious Activity
Monitor your SSH logs for suspicious activity. Look for any failed login attempts, unusual commands being executed, or other signs of compromise. If you see anything suspicious, investigate immediately.
Real-World Examples

SSH plays a crucial role in enhancing security and remote access in various real-world applications. Let’s explore some practical examples:
SSH provides a secure channel for remote server management, allowing administrators to perform tasks like software updates, configuration changes, and troubleshooting from any location with an internet connection.