In the realm of Linux operating systems, Linux Mint stands out as a user-friendly and powerful distribution. Its versatility extends to the world of secure remote access, where the SSH server plays a crucial role. This comprehensive guide will delve into the intricacies of the Linux Mint SSH server, empowering you to harness its potential for secure and efficient remote management.
SSH, short for Secure Shell, is a vital tool for system administrators, allowing them to connect to and manage remote systems securely over a network. By establishing an encrypted channel between two computers, SSH provides a robust and reliable means of executing commands, transferring files, and troubleshooting issues remotely.
Introduction to Linux Mint SSH Server
An SSH server in Linux Mint is a powerful tool that allows you to securely connect to and manage your computer remotely. It provides a secure encrypted connection over a network, enabling you to perform various tasks as if you were physically present at the machine.
Using an SSH server offers numerous benefits. It enhances security by encrypting all data transmitted between the client and the server, preventing unauthorized access to sensitive information. Additionally, it allows for remote management and troubleshooting, enabling you to access and control your computer from anywhere with an internet connection.
Installation and Configuration of SSH Server
To establish a secure connection with your Linux Mint system, installing and configuring an SSH server is crucial. This guide provides detailed instructions to set up and configure the SSH server, ensuring a secure and efficient remote access solution.
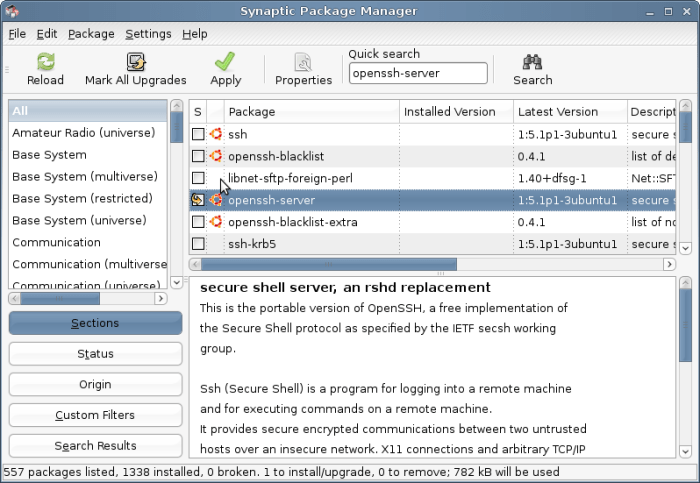
The SSH server in Linux Mint is managed by the OpenSSH package. Installing and configuring it involves several essential steps, which we will explore in this section.
Installation
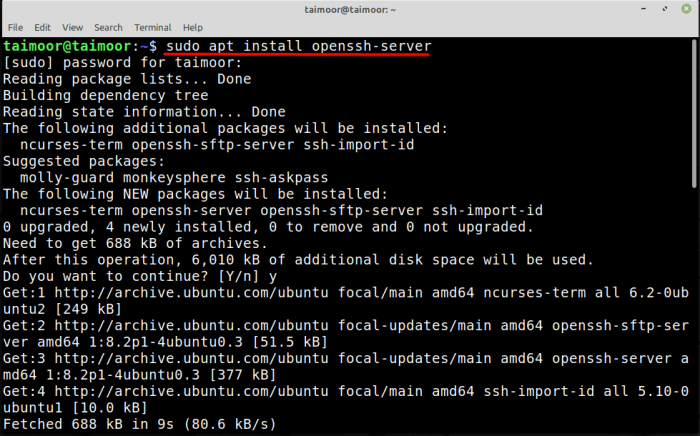
To install the OpenSSH server, open a terminal window and execute the following command:
sudo apt install openssh-server
Enter your password when prompted, and the installation will begin. Once the installation is complete, you can proceed to configure the SSH server.
Configuration
The SSH server configuration file is located at /etc/ssh/sshd_config . You can edit this file using any text editor, such as nano or vi. Here are some essential configuration settings to consider:
- Port: By default, SSH listens on port 22. You can change this port for security reasons, but it’s important to remember the new port number.
- Protocol: SSH supports multiple protocols, including SSHv2 and SSHv1. It’s recommended to disable SSHv1 due to security concerns.
- Ciphers: SSH uses encryption algorithms called ciphers to protect data in transit. It’s important to use strong ciphers to ensure data security.
- MACs: Message Authentication Codes (MACs) are used to ensure the integrity of SSH packets. Similar to ciphers, it’s crucial to use strong MACs for security.
- Authentication: SSH supports various authentication methods, including password-based, public-key, and two-factor authentication. It’s recommended to use strong authentication methods for enhanced security.
After making the necessary changes, save the configuration file and restart the SSH server using the following command:
sudo systemctl restart ssh
With these steps, you have successfully installed and configured the SSH server on your Linux Mint system, providing a secure and reliable remote access solution.
Securing the SSH Server

Securing the SSH server is crucial to prevent unauthorized access and attacks. Implementing robust security measures ensures the integrity and confidentiality of your system.
Best practices include:
- Strong Password Policies: Enforce complex passwords with minimum length, character diversity, and regular expiration.
- Key-based Authentication: Use public-key cryptography to provide a more secure alternative to passwords.
- Firewall Configuration: Restrict access to SSH from specific IP addresses or ranges using firewall rules.
- Disable Root Login: Prevent direct login as the root user, which can escalate privileges.
- Use a Non-Standard SSH Port: Change the default SSH port (22) to a less common one, making it harder for attackers to scan for open ports.
- Enable Two-Factor Authentication (2FA): Add an extra layer of security by requiring a second factor, such as a code sent to a mobile device, for authentication.
- Regular Security Updates: Install the latest security patches and updates to address vulnerabilities and enhance server protection.
Managing SSH Keys
SSH keys are cryptographic key pairs used to authenticate SSH connections securely. They provide an alternative to password-based authentication, offering enhanced security and convenience.
To generate an SSH key pair, use the ssh-keygen command. Specify the type of key (e.g., RSA, DSA) and the desired key length. The command will create two files: a public key (with a .pub extension) and a private key (without an extension).
Distributing Public Keys
To grant authorized access to users, distribute the public key to the remote server. This can be done manually by copying the key to the ~/.ssh/authorized_keys file on the server or using the ssh-copy-id command, which automates the process.
Managing Private Keys
Protect the private key securely. Store it in a safe location and avoid sharing it with others. Keep the private key file permissions set to 600 (read/write only for the owner) for maximum security.
Remote Access and Management
SSH is a powerful tool for remote access and management of Linux Mint systems. It allows you to securely connect to your system from anywhere with an internet connection, and perform various administrative tasks.
To use SSH, you will need an SSH client. Some popular SSH clients include OpenSSH, PuTTY, and MobaXterm. Once you have installed an SSH client, you can connect to your Linux Mint system using the following command:
“`ssh username@hostname“`
Where “username” is your username on the Linux Mint system, and “hostname” is the IP address or domain name of the system.
Once you are connected, you can use a variety of SSH commands to manage your system. Some common SSH commands include:
- ls: List files and directories
- cd: Change directory
- mkdir: Create a directory
- rmdir: Remove a directory
- cp: Copy a file
- mv: Move a file
- rm: Remove a file
- sudo: Run a command with superuser privileges
You can also use SSH to run commands on your Linux Mint system. To do this, simply type the command followed by a semicolon (;). For example, to run the “ls” command, you would type:
“`ls;“`
SSH is a versatile tool that can be used for a variety of remote access and management tasks. By understanding the basics of SSH, you can easily manage your Linux Mint systems from anywhere.
SSH Configuration for Advanced Users

Advanced SSH configuration options enable greater control over SSH functionality and security. These options include port forwarding, tunneling, and SOCKS proxy.
Port Forwarding
Port forwarding allows SSH to redirect traffic from a remote port to a local port, enabling secure access to specific services. For instance, port forwarding can create a secure tunnel to access a web server on a remote machine from a local browser.
Tunneling
Tunneling establishes a secure channel between two hosts, allowing the transmission of data through an untrusted network. Tunneling is useful for encrypting traffic between applications or services that do not natively support encryption.
SOCKS Proxy
SOCKS proxy provides a secure and anonymous way to access remote resources by routing traffic through an intermediary server. SOCKS proxy can be configured with SSH to enhance the security and privacy of network connections.
Troubleshooting SSH Issues

SSH connection issues can arise due to various reasons. This section provides insights into common SSH errors and techniques for resolving them.
Identifying Common SSH Errors
- Connection refused: Occurs when the SSH server is not running or the port is blocked by a firewall.
- Permission denied: Incorrect username or password, or insufficient permissions for the user.
- Host key verification failed: The client cannot verify the server’s host key due to a mismatch or outdated key.
- SSH protocol version mismatch: Client and server are using incompatible SSH versions.
Diagnosing and Debugging SSH Connection Problems
To diagnose and debug SSH connection issues, consider the following techniques:
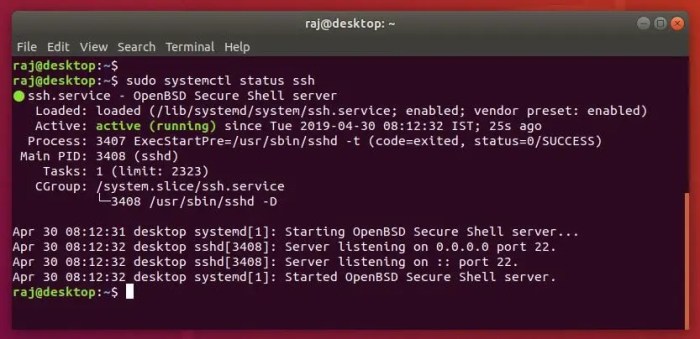
- Check SSH server status: Ensure the SSH server is running using the command ‘systemctl status sshd’.
- Verify firewall settings: Check if the SSH port (default: 22) is open and not blocked by the firewall.
- Examine SSH logs: The SSH server logs can provide valuable insights into connection issues. Check the logs in ‘/var/log/auth.log’ or ‘/var/log/secure’ for error messages.
- Use SSH debugging: Enable SSH debugging by adding ‘LogLevel DEBUG’ to the ‘/etc/ssh/sshd_config’ file. This will provide detailed debugging information.
- Check host key fingerprint: Verify that the host key fingerprint matches the expected value to prevent man-in-the-middle attacks.
SSH for Remote Desktop Access
SSH allows remote desktop access to Linux Mint systems, enabling users to control their desktop environment from anywhere with an internet connection.
Graphical User Interface (GUI) Access
Several tools and techniques facilitate GUI access over SSH:
-
- -*X11 Forwarding
Enables forwarding of graphical applications from the remote system to the local display.
- -*X11 Forwarding
-*VNC (Virtual Network Computing)
Allows remote control of the entire desktop environment, including the graphical user interface (GUI).
-*X2Go
A lightweight remote desktop protocol optimized for low-bandwidth connections.
SSH for File Transfer and Management
SSH offers a secure and efficient method for transferring and managing files remotely. It enables secure file transfer between local and remote systems, as well as remote file editing.Using
SSH for file transfer involves utilizing secure copy (SCP) or SSH file transfer protocol (SFTP) commands. SCP is a command-line tool that securely copies files between two hosts, while SFTP is an interactive file transfer protocol that provides a graphical interface for file management.
File Transfer with SCP
To transfer files using SCP, enter the following command:
scp [source file] [username]@[remote host]:[destination path]
For example, to copy the file “myfile.txt” from the local system to the remote host “example.com” under the user “user1” in the “/home/user1/Documents” directory, use:
scp myfile.txt [email protected]:/home/user1/Documents
File Transfer with SFTP
To use SFTP, connect to the remote host using an SFTP client. Once connected, you can navigate and manage files remotely as you would on your local system.
Remote File Editing
SSH also allows for remote file editing using the SSH File Editor (SFE) or any other compatible text editor. To edit a remote file, connect to the remote host via SSH and use the following command:
sfe [remote file path]
This will open the remote file in the SFE for editing.
SSH for Automation and Scripting
SSH can be utilized to automate tasks and execute scripts on remote Linux Mint systems. This capability enhances efficiency and simplifies system administration.
SSH-based Scripting
SSH-based scripts allow for the automation of common system administration tasks, such as:
- Software installation and updates
- Configuration file management
- Log file monitoring
- Security audits
By creating scripts that encapsulate these tasks, administrators can streamline their workflows and reduce the potential for human error.
Final Summary
Mastering the Linux Mint SSH server unlocks a world of possibilities for remote system administration. By understanding the concepts of SSH keys, secure configuration, and advanced usage techniques, you can harness the power of SSH to streamline your workflow, enhance security, and elevate your remote management capabilities.
Whether you’re a seasoned Linux user or just starting your journey, this guide has equipped you with the knowledge and tools to conquer the challenges of remote access with confidence.