In the realm of system administration, secure remote access is paramount. SSH, the Secure Shell protocol, stands as a cornerstone of secure remote connectivity, enabling system administrators and users alike to securely manage and access systems over a network. In this comprehensive guide, we delve into the intricacies of installing and configuring an SSH server on Linux Mint, empowering you with the knowledge to establish a robust and secure remote access solution.
SSH’s significance extends beyond mere remote access. It serves as a cornerstone for system administration tasks, network management, and secure file transfers, providing a versatile and encrypted channel for executing commands, transferring files, and managing systems remotely. By harnessing the power of SSH, you gain the ability to securely access and manage your Linux Mint system from anywhere in the world, fostering productivity and efficiency.
Introduction

The installation of an SSH (Secure Shell) server on Linux Mint is a crucial step in enhancing the security and remote access capabilities of your system. SSH provides a secure and encrypted channel for remote logins and file transfers, allowing administrators and users to securely access and manage systems from anywhere with an internet connection.
With SSH, you can establish a secure connection to your Linux Mint system from a remote computer, execute commands, transfer files, and perform various administrative tasks without compromising the security of your system. This makes SSH an invaluable tool for system administrators, network engineers, and anyone who needs to remotely access and manage multiple systems.
Advantages of SSH
SSH offers numerous advantages over traditional remote access methods, including:
- Encryption: SSH encrypts all data transmitted between the client and server, ensuring the privacy and integrity of your communications.
- Authentication: SSH provides robust authentication mechanisms, including password-based, public-key, and two-factor authentication, to protect against unauthorized access.
- Secure File Transfer: SSH allows for secure file transfers between the client and server, enabling you to securely copy files, update system configurations, and perform backups.
- Remote Command Execution: With SSH, you can remotely execute commands on the server, allowing you to perform administrative tasks, troubleshoot issues, and manage your system from anywhere.
Prerequisites
Setting up an SSH server on Linux Mint requires several prerequisites to ensure a secure and functional connection. This includes updating the system, installing essential packages, configuring the firewall, and checking the system’s IP address for proper network connectivity.
Updating the System
Before proceeding, it is crucial to update the system to the latest version to obtain security patches and ensure compatibility with the SSH server software. To do this, open a terminal window and run the following commands:
sudo apt-get updatesudo apt-get upgrade
Installing Essential Packages
To set up an SSH server, you will need to install the SSH server software and some additional packages for secure communication. Run the following command to install these packages:
sudo apt-get install openssh-server
Configuring the Firewall
To allow incoming SSH connections, you need to configure the firewall to open the SSH port (usually port 22). Run the following command to do this:
sudo ufw allow 22/tcp
You can also use the following command to enable SSH connections through the firewall:
sudo systemctl enable ssh
Checking the System’s IP Address
To connect to the SSH server, you will need to know the IP address of the system. Run the following command to find the IP address:
ifconfig
Look for the IP address associated with the network interface you are using (e.g., eth0 or wlan0).
Installation and Configuration
To ensure a secure and efficient SSH server setup, we’ll delve into the installation and configuration process, covering aspects such as package installation, SSH key management, user and group management, and remote login enablement. Additionally, we’ll explore the modification of SSH configuration files to tailor SSH settings according to your specific requirements.
Installation of OpenSSH Server Package
Begin the installation process by updating the system’s package index using the following command:
sudo apt update
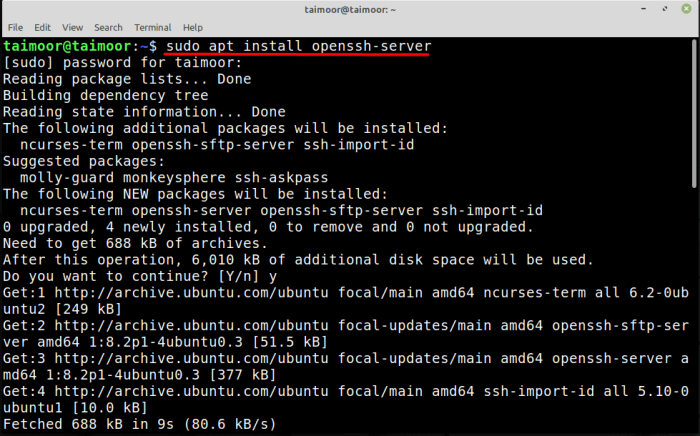
Next, proceed with the installation of the OpenSSH server package with this command:
sudo apt install openssh-server
Configuration of SSH Keys
Generate an SSH key pair for authentication purposes using the command below:
ssh-keygen
-t rsa
-b 4096
When prompted, provide a secure location to save the private key. The public key will be stored in a file with the .pub extension.
Management of Users and Groups
Create a new user for SSH access with the following command:
sudo adduser username
Next, add the newly created user to the ‘sudo’ group, granting administrative privileges, with this command:
sudo usermod
-aG sudo username
Enabling Remote Login
To allow remote login via SSH, edit the SSH configuration file located at /etc/ssh/sshd_config. Use the following command:
sudo nano /etc/ssh/sshd_config
Locate the line that starts with ‘PermitRootLogin’ and set it to ‘no’.
Similarly, find the line starting with ‘PasswordAuthentication’ and set it to ‘no’ to disable password-based authentication.
Restart the SSH service to apply the changes with this command:
sudo service ssh restart
Customization of SSH Configuration
To modify advanced SSH settings, edit the SSH configuration file (/etc/ssh/sshd_config) again using the command:
sudo nano /etc/ssh/sshd_config
Here are some common settings you may want to adjust:
- Port: Change the default SSH port (22) to a different port for increased security.
- Protocol: Specify the SSH protocol version to allow (e.g., Protocol 2).
- Ciphers: Configure the encryption algorithms to use for secure data transmission.
- MACs: Set the message authentication codes (MACs) to ensure data integrity.
After making changes, restart the SSH service to implement them:
sudo service ssh restart
Securing SSH Access

Securing SSH access is crucial for preventing unauthorized login attempts and maintaining the integrity of your system. This section will discuss the importance of securing SSH access, provide steps for disabling password authentication and enabling public key authentication, and elaborate on generating and managing SSH keys.
Disabling Password Authentication
Password authentication is a common method for logging into SSH servers, but it is also susceptible to brute-force attacks and other security risks. Disabling password authentication and relying on public key authentication is a more secure approach.
- To disable password authentication, edit the SSH configuration file (/etc/ssh/sshd_config) and locate the line that says “PasswordAuthentication yes”.
- Change “yes” to “no” to disable password authentication.
- Restart the SSH service for the changes to take effect.
Enabling Public Key Authentication
Public key authentication is a more secure alternative to password authentication. It relies on a pair of cryptographic keys: a public key and a private key. The public key is shared with the server, while the private key is kept secret on the client machine.
- To enable public key authentication, generate an SSH key pair using the “ssh-keygen” command.
- Follow the prompts to specify the type of key (RSA or DSA) and the location to save the key pair.
- The generated key pair will consist of a public key file (with a .pub extension) and a private key file (without an extension).
- Copy the public key to the authorized_keys file on the server. The location of the authorized_keys file may vary depending on your SSH server configuration.
- Restart the SSH service for the changes to take effect.
Configuring Key-Based Authentication
Once you have generated and managed SSH keys, you can configure key-based authentication to allow access to the SSH server using the private key.
- On the client machine, use the “ssh-copy-id” command to copy the public key to the server and configure key-based authentication.
- Specify the username and the server’s hostname as arguments to the command.
- Enter the password for the user when prompted.
- Once the key is copied, you should be able to log into the SSH server using the private key without a password.
Testing SSH Connectivity
Testing SSH connectivity is crucial to ensure successful remote login and secure access to your Linux Mint server.
Establishing SSH Connection
- Open a terminal window on your remote client.
- Execute the following command, replacing “username” with your Linux Mint server username and “server_ip” with the server’s IP address or domain name:
ssh username@server_ip
- If prompted, enter your server’s password.
- Upon successful authentication, you’ll be connected to your Linux Mint server.
Troubleshooting Common SSH Issues
- Port Conflicts:
- Ensure SSH is listening on the default port (22) or a custom port you’ve configured.Check firewall rules to ensure the port is open.
- Firewall Blocking:
- Confirm that your firewall allows incoming connections on the SSH port. Adjust firewall rules accordingly.
- Incorrect Configuration:
- Verify that SSH is enabled and properly configured on your Linux Mint server. Check SSH configuration files for any errors.
SSH Server Maintenance

Maintaining the SSH server is crucial for its security and stability. Regular updates and monitoring are essential to protect against vulnerabilities and unauthorized access.
Regular Software Updates
- Continuously update the SSH server software and its dependencies.
- Updates often include security patches that fix vulnerabilities and improve server stability.
- Configure automatic updates or regularly check for available updates and apply them promptly.
Security Patch Management
- Apply security patches as soon as possible after they are released.
- Patches address known vulnerabilities and protect against potential attacks.
- Monitor security advisories and bulletins to stay informed about vulnerabilities and available patches.
Monitoring SSH Logs
- Enable SSH logging to capture connection attempts, authentication events, and errors.
- Regularly review SSH logs for suspicious activities, such as failed login attempts or unauthorized access.
- Use log analysis tools or SIEM (Security Information and Event Management) systems to monitor SSH logs efficiently.
Detecting Suspicious Activities
- Look for patterns of failed login attempts, especially from different IP addresses.
- Monitor for unusual login times or attempts from unexpected locations.
- Investigate any suspicious activities promptly to identify potential security breaches.
Responding to Security Incidents
- Have a response plan in place for handling security incidents related to SSH.
- Quickly isolate compromised systems and prevent further unauthorized access.
- Conduct a thorough investigation to determine the root cause and implement appropriate remediation measures.
Troubleshooting Common SSH Issues
SSH, while robust, can encounter various issues. Troubleshooting SSH problems requires identifying the root cause, whether it’s a misconfiguration, network connectivity problem, or authentication error. This section explores common SSH issues and provides practical steps to resolve them.
Connection Failures
Connection failures occur when an SSH client cannot establish a connection with the SSH server. Common causes include:
- Incorrect IP address or hostname: Ensure the SSH client is connecting to the correct IP address or hostname of the SSH server.
- Firewall or network issues: Check if the firewall on the server or client is blocking the SSH port (typically port 22). Additionally, verify network connectivity between the client and server.
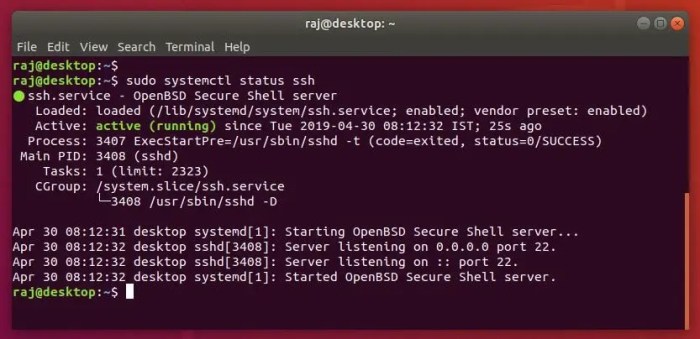
- SSH server not running: Confirm that the SSH server is running on the server machine. If not, start the SSH service.
Authentication Errors
Authentication errors occur when the SSH client fails to authenticate with the SSH server. Common causes include:
- Incorrect username or password: Ensure the SSH client is using the correct username and password for the SSH server.
- Disabled SSH login: Check if SSH login is enabled on the server. Some systems may disable SSH login by default.
- Incorrect SSH key: If using SSH keys for authentication, verify that the correct private key is being used on the client side and the public key is added to the authorized_keys file on the server side.
Permission Denied Errors
Permission denied errors occur when the SSH user lacks the necessary permissions to access the server. Common causes include:
- Incorrect file or directory permissions: Ensure the SSH user has the appropriate permissions (read, write, execute) for the files and directories they are trying to access.
- Incorrect umask settings: Check the umask settings on the server to ensure they are not too restrictive, preventing the SSH user from creating files and directories with the desired permissions.
SSH Key Problems
SSH key problems can arise due to incorrect key generation, transfer, or usage. Common issues include:
- Incorrect key generation: Ensure the SSH keys are generated using a strong encryption algorithm and an appropriate key length.
- Key transfer issues: Verify that the public key is correctly transferred to the authorized_keys file on the server. Check for any typos or incorrect formatting in the key.
- Key permissions: Ensure the private key file on the client side has the correct permissions (read-only for the owner) to prevent unauthorized access.
Using SSH Debugging Tools and Log Files
SSH debugging tools and log files can be invaluable in diagnosing and resolving SSH issues. Common tools and techniques include:
- SSH debugging flags: Use the
-v or
-vvv flags with the SSH command to enable verbose debugging output, which can provide detailed information about the SSH connection process. - SSH log files: Check the SSH server and client log files for error messages and clues about the issue. Common log file locations include /var/log/auth.log on Linux servers and %USERPROFILE%\.ssh\known_hosts on Windows machines.
Additional Resources
Delve deeper into the world of SSH server installation and configuration on Linux Mint with this curated collection of additional resources.
Whether you’re a seasoned system administrator or just starting out, these resources provide valuable insights, tutorials, and support channels to enhance your knowledge and troubleshooting skills.
Tutorials and Articles
- Linux Mint SSH Server Installation Guide: A step-by-step guide that walks you through the process of installing and configuring an SSH server on Linux Mint.
- Securing Your SSH Server: Learn how to secure your SSH server against unauthorized access and potential attacks.
- Troubleshooting Common SSH Issues: A comprehensive guide to resolving common SSH-related issues, including connection problems, authentication errors, and more.
Community Forums and Mailing Lists
- Linux Mint Forums: Engage with the Linux Mint community to seek help, share experiences, and contribute to discussions related to SSH and other Linux topics.
- Ubuntu Forums: As Ubuntu shares a common ancestry with Linux Mint, the Ubuntu forums offer a wealth of information and support for SSH-related queries.
- SSH Mailing List: Join the SSH mailing list to receive updates, announcements, and discussions about SSH development and best practices.
Official Documentation
- SSH Server Documentation: Access the official documentation for SSH server software, such as OpenSSH, to gain in-depth knowledge about its features, configuration options, and security considerations.
- Linux Mint Documentation: Explore the Linux Mint documentation to find detailed instructions, FAQs, and troubleshooting tips related to SSH and other system administration tasks.
Final Summary
With SSH securely installed and configured on your Linux Mint system, you’ve unlocked a world of possibilities. Remotely manage your system, securely transfer files, and administer your network with ease. Embrace the power of SSH and elevate your system administration skills to new heights.
As you continue your journey into the world of SSH, remember to stay vigilant in maintaining and securing your server. Regular updates, monitoring, and adherence to best practices will ensure that your SSH server remains a bastion of security.